Tuesday, October 26, 2010

Kid Friendly Halloween Treat

I saw these little pumpkins on a blog, but when I tried to do it like her I failed miserably, so I had to change up the process a bit. They turned out pretty cute and my kids got to pass them out to their friends. Who in turn devoured them.
I didn't have orange melting chocolates, but I reccomend them since the most time consuming part was trying to make the right color of orange with the chocolates.
I used about half a pkg. of oreos and 1 1/2 pkg of melting chocolates
First I dipped one side in then let that dry then dipped the other side
When they started drying I filled in the little gaps and added a little pretzel piece to the top with some extra chocolate.
after they dried I piped some green leaves on, the one I first saw had a green ribbon tied around it. Since they were for the kids I wasn't quite as worried about presentation as you can tell.


Saturday, October 23, 2010

My time in Virginia Beach

My mom and I took a girls trip over to Virginia Beach this past weekend to visit my oldest friend Jill Tyler and her fam. It was such an fun trip, we spent the first day at Colonial Williamsburg enjoying the crisp fall weather, shopping and of course amazing food.

Jill told us about this place that has AMAZING Hot Cocoa, and she was right it was Amazing even the homemade marshmallow inside was to die for.
Here is Jill dipping it into her Hot Chocolate ( or what we like to call the cup of melted chocolate)!
While this is one of the most extraordinary cups of Cocoa I have ever had, you must not drink one all by yourself after about the 8th sip or so it's overwhelming richness makes you want to chuck it! I know it sounds weird but both Jill and I had the exact same reaction and couldn't even make it through a 1/3 of the cup. Anyways if you do happen to make it out to Williamsburg hit up this place and see for yourself.
The Blue Talon


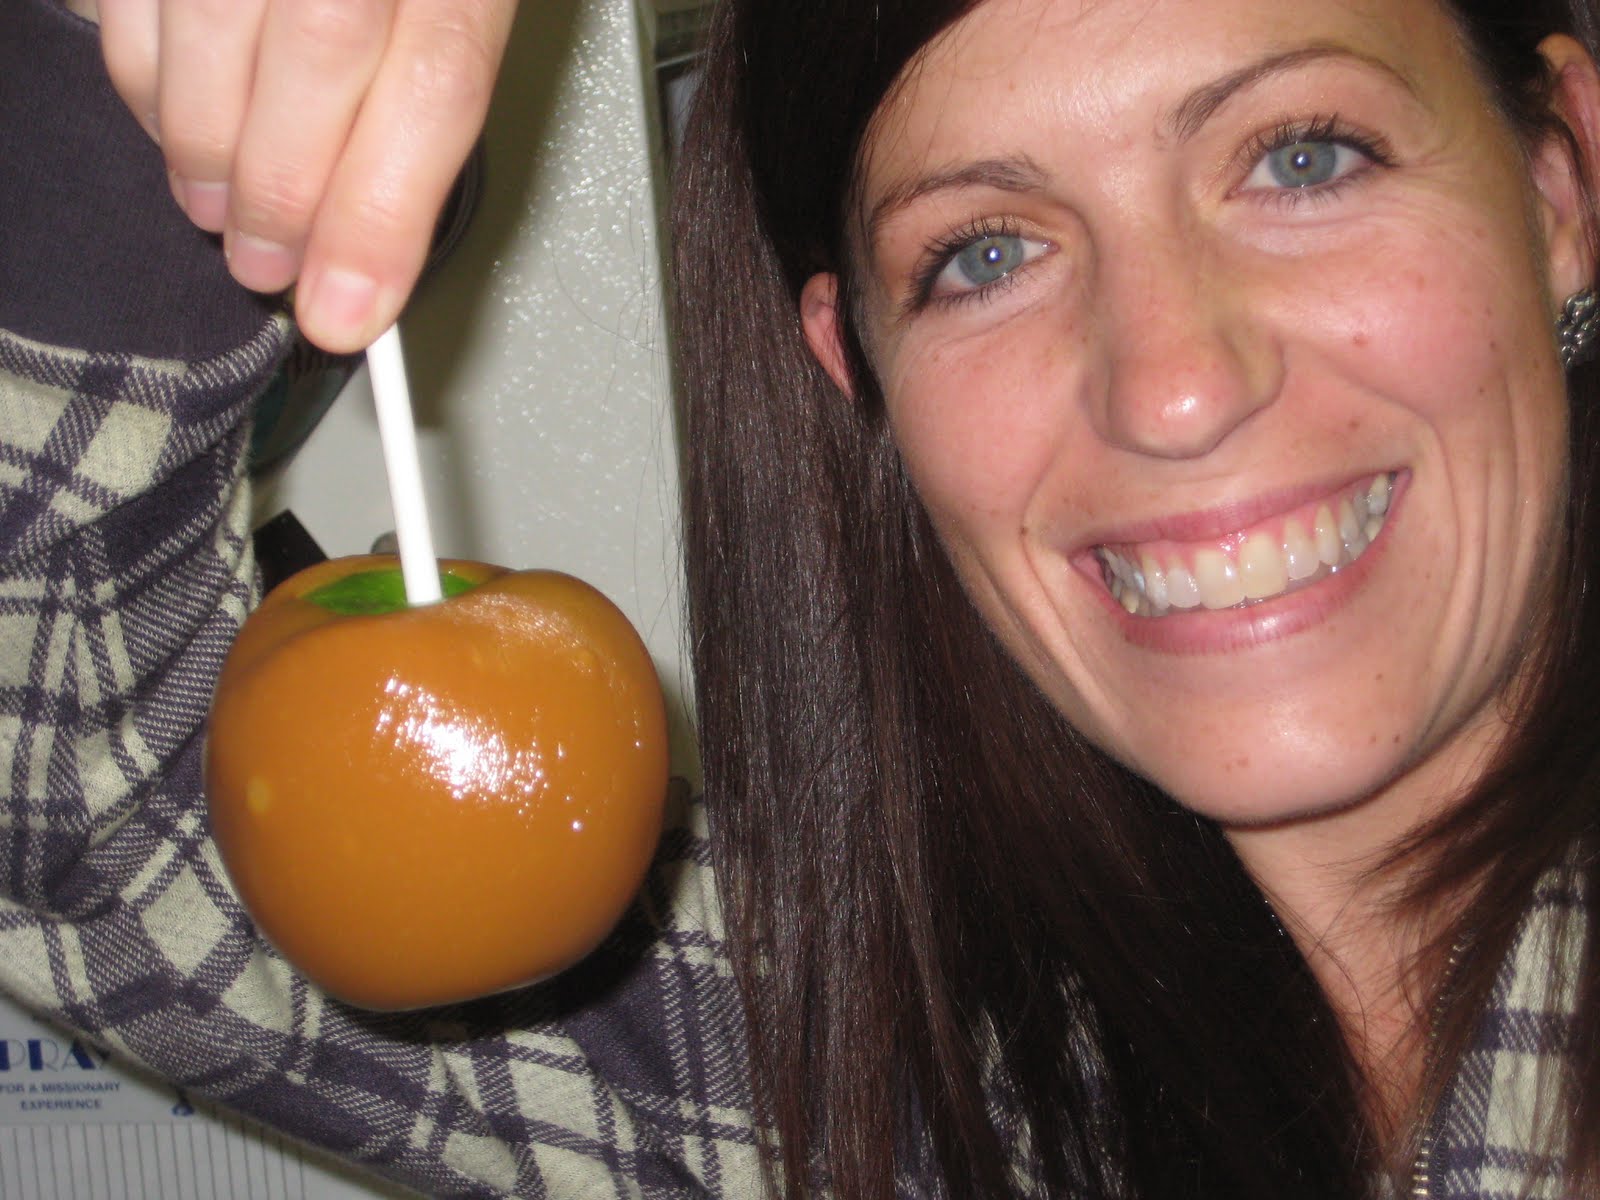
Both Jill and I have both been wanting to try these delicious looking Apple Pie Caramel Apples off The Girl Who Ate Everything .
We both aren't the best "candy makers" but we gave it a try.


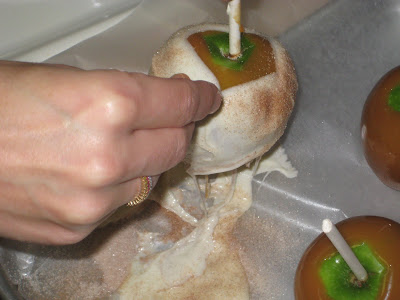
Jill doing her special "tap" technique to get the excess caramel off.


"I am so proud of Me!"
We ran out of sticks so the knife made do.
Mixing up the white chocolate
adding the cinnamon sugar
ours didn't turn out quite as perfect as hers, but of freaking my they were MMMMMM Good!
I don't know exactly how many we ate, lets just say the kids didn't get much.
Will I make these again, Yes indeedy!

While we were there the Tyler's took us to the famous Wood Chicks BBQ, who won the Throwdown with Bobby Flay for their pork sandwich and is also on Pit Masters.
Well BBQ Pork sandwiches are one of my many food weakness and I couldn't wait to try it
I apologize that I ate it too fast and was unable to take a picture. But I will tell you it Rocked! So if you have a chance please stop in to Wood Chicks.

Thanks for a GREAT time Tyler's you fed us well!
Jill will also be featured in an upcoming guest food post! Till then, happy trails.

Thursday, October 21, 2010

A Sweet Pumpkin Gift!

My friend Jill received the cutest treat from her visiting teachers. I knew I had to make some as soon as I got home. The recipes look Amazing and I am all about the Pumpkin. I would have liked to insert my own recipes but I am not that computer savy. So if anyone knows how to do that I would love to know. For now I can't wait to try these ones. If you would like to print it out just go here.

Tuesday, October 19, 2010

Philly Calzones

I know I make recipes from Mels Kitchen a ton, but can you blame me when they are This Good! We love Philly Cheese Steaks at the Cummard household, but normally I am not a Calzone fan. I don't know if it is because the filling to bread ratio is more filling, or because the roll recipe rocks. Either way I LOVED this, I could make it once a week and be happy. Don't worry it is Easy Peasy!


This is a great part to include the kids in.


Philly Cheesesteak Calzone
*Makes 6-7 calzones

1 recipe french bread roll dough
16 ounces deli roast beef, thinly sliced (leftover roast beef like this Italian Beef or this French Dip would work great in this)
1 tablespoon canol or olive oil
1-2 medium yellow onions, cut in half and sliced into thin half moons
1-2 green peppers, chopped
12 ounces white button mushrooms, sliced
8 ounces provolone cheese, grated or thinly sliced

Make the french bread roll recipe and follow the steps through the first rise. Separate the dough into 6 or 7 pieces and shape into a ball. Let them rest lightly covered for 10-15 minutes to help the dough relax a bit.

While the dough rests, preheat the oven to 400 degrees and heat the oil in a large nonstick skillet. Add the onions and mushrooms and cook, stirring now and then, until the onions begin to become translucent and the mushrooms start to cook down, about 3 minutes. Add the peppers and continue to cook until the vegetables are tender and most of the liquid has cooked off, about another 3-5 minutes. Toss in the roast beef and cook until the beef is warmed through (if there is still a lot of liquid left in the skillet from adding the roast beef, either drain the liquid or cook until the liquid evaporates). Take the skillet off the heat.

Using a nonstick mat or a lightly greased countertop, working one at a time, start flattening each piece of dough into a circle.

Using a nonstick mat or a lightly greased countertop, working one at a time, start flattening each piece of dough into a circle.

Top the meat and veggies with cheese.

Grab the top edge of the dough and fold it up and over the filling.

Using the tines of a fork, press the edges of the calzone together until well sealed.

arefully lift the calzone onto a silpat-lined or lightly greased baking sheet. Follow this process with the remaining pieces of dough, spacing them at least one to two inches apart on the baking sheet. Bake for 14-15 minutes until golden brown and cooked through.


Eventually you’ll want it between six or eight inches in diameter (depending on how thick you want the calzone – I prefer them on the thinner side so they aren’t overly doughy).


On the bottom half of the dough circle, leaving at least a 3/4-inch edge on the bottom and sides to crimp later, layer on a portion of the meat and veggies, taking care to portion the meat and vegetables so you’ll have enough for each calzone.

Thursday, October 7, 2010

An all in one Pasta dish!

I made this dish the other night when my dad was over. Now I thought it was really good, but he said it was the best thing he EVER ate! I wouldn't go as far as too say that but it was super creamy and delicious. A perfect "all in one dish" meal.


  • Creamy Orzo with Chicken, Mushrooms and Red Peppers
  • from Mel's Kitchen Cafe
  • *Note: this pasta is best served immediately as it tends to get less creamy as it sits at room temperature – so serve warm right as it finishes cooking! (Incidentally, it heated up just fine the next day in the microwave on low power.)
  • *Serves 4
  • 1 tablespoon olive oil
    2 average-sized chicken breasts (about 1 to 1 ½ pounds), cut into chunks
    2 red bell peppers, cut into ½-inch pieces
    8 ounces white button mushrooms, quartered
    1 teaspoon dried thyme
    3 cloves garlic, finely minced
    1 pound orzo pasta
    8 ounces cream cheese, softened (can use 1/3 less fat cream cheese)
    1 cup reserved pasta water
    1/2 teaspoon salt
    1/2 teaspoon pepper
    ½ cup freshly grated Parmesan cheese
    3 tablespoons chopped fresh flat leaf parsley
    Squeeze of fresh lemon juice (from 1 lemon)
  • Bring a large pot of salted water to a boil. Add the orzo and cook according to package directions until tender. When the orzo is ready, reserve 1 cup of the pasta water (ladling it into a small bowl is my method) and then drain the orzo and set aside.
  • While the orzo cooks, in a large nonstick skillet, heat the olive oil over medium heat. Season the chicken with salt and pepper. Add the chicken to the hot oil and brown on all sides. When nicely browned (but not all the way cooked through), add the peppers, mushrooms and thyme. Stir and let cook for about 5 minutes, until the chicken is cooked through and the mushrooms and peppers have softened and browned and most of the liquid has evaporated. Add the garlic and cook, stirring, until fragrant, about 1 minute.
  • In the skillet over medium heat, add the softened cream cheese (if you forgot to let the cream cheese soften at room temperature, no worries! Pop it in the microwave for one minute on 40% power) in bite sized chunks and stir so that the cream cheese melts and coats the chicken and vegetables. Add the reserved pasta water and bring to a simmer. Add ½ teaspoon salt and ½ teaspoon pepper. Stir. Add the orzo, Parmesan, lemon juice and fresh parsley. Stir to combine and heat through. Garnish with additional Parmesan and parsley.

Tuesday, October 5, 2010

Flour Tortilla Fun!

Back during my Super Cool EA days, my friend Gary would come over and make us the yummiest stuff . My favorite was when he made Homemade Tortilla chips. Since then I will occasionally make my own corn tortilla chips, but recently my SIL Suzy introduced me to El Rey's ( from Globe) Flour Tortilla chips. Well they are freaking awesome, so I found out how to make those and made me up a batch . and what better a meal to go with it than Taco Salad in a Homemade Taco bowl! This smart idea was from Mel's Kitchen Cafe. So if you want a super easy way to impress some dinner guests, your husband or kids try this meal.


Taco Salad

Ground beef
Black/Pinto Beans
Lettuce
Tomato
Salsa
Sour cream
Cilantro
Avacado
Cheese
El Pato
Throw this and anything else you can think of into a Bowl and enjoy


Flour Tortilla Chips

1 package flour tortillas cut into strips or triangles

canola/vegetable oil for frying

salt

Let the tortillas dry out for about 10-15 min. in a single layer,before frying. Fry on med-high, they fry very fast. They will need to turn almost immediately after they get dropped in. You want them to brown and bubble up but not to much. Also do not overcrowd the pan. Place them on a paper towel to drain. Sprinkle with salt.

Serve and enjoy - can store in an airtight bag. Even better the second day.

Homemade Taco Tortilla Bowls

*Serves 6

6 burrito-size flour tortillas
Olive oil or Canola oil
6 oven-safe cups or canning jars

Preheat the oven to 400 degrees. On a rimmed baking sheet, place the cups or jars upside down, evenly spacing them to make room for the tortillas that will be draped over them.

Microwave the tortillas for about 30 seconds, until they are soft and pliable. Rub a teaspoon or so of oil on the front and back of the tortilla. I used my fingers so that I could make sure to coat the entire surface of the tortilla. It doesn’t need to be a heavy coating of oil, just enough to help the tortilla crisp up and not stick to the jar or cup. Drape each tortilla over a cup or jar (I found that the tall jelly/jam jars I had sitting in my cupboard worked great, but my friend Lesli uses oven-safe tea cups and gets great results, too). I softly pressed the sides down a bit to help them form more of a bowl shape.

Bake the tortilla bowls for about 8-10 minutes, checking often so they don’t burn, until the tortillas are nicely browned and crisp. Remove the baking sheet from the oven and let the tortillas cool for a few minutes before gently removing them from the cups or jars.

Related Posts Plugin for WordPress, Blogger...